Tuesday, June 24, 2014

Raspberry Lemon Iced Tea


As an intern for NourishRDs, I spend many work days with McKenzie at her apartment, the library, and local cafes. These days are creative, fun, and productive… until 4 o’clock rolls around. This isn’t a good time for us – we get hungry, thirsty, and a little cranky. So, as we simultaneously give each other a smile, we both know its tea time! An iced tea break gives us just what we need to get out of the 4 o’clock slump.

Iced tea has been our hero, picking us up in times of struggle and desperation. Since June is National Iced Tea Month, there’s a lot to celebrate. And so, we encourage you to take a break and unwind with this recipe for Raspberry Lemon Iced Tea.


Ingredients:
1 cup water
1 tea bag (green or black)
¼ cup frozen raspberries
½ lemon, juiced
Ice

Directions:
  1. Bring a cup of water to a boil. Let the tea steep for 5 minutes and place in the refrigerator to cool.
  2. Meanwhile, blend the frozen raspberries until liquefied.
  3. Combine the raspberries and tea. Stir in the lemon juice and add ice.
  4. Serve cold.  


Recipe and photo by our wonderful contributing blogger, Jaime Ruisi.

Saturday, June 21, 2014

{Recipe Redux} Floral Flavors! A Floral Goat Cheese Tart with Lavender Raspberry Salad

The theme for the Recipe Redux challenge this month is such a fun one:  Floral Flavors.  And one that brings back great memories.  Once upon a time, I had a personal chef and small catering business.  The first wedding I catered, the couple wanted a lavender theme for their intimate backyard wedding, and so I created a tasting menu with a hint of lavender in each dish.  The first course I served—a lavender goat cheese tart with lavender raspberry salad—is perfect for early summer, and one I still make often.

Just be cautious when cooking with lavender, as the strong taste and smell can overwhelm a dish.  A little goes a long way. 

Enjoy, preferably with someone you love!


Herbed Goat Cheese Tart with Lavender Raspberry Salad

Serves 12

1 puff pastry, thawed
1 tablespoon butter
1 tablespoon olive oil
2 leeks, cleaned and sliced
1 egg, lightly beaten
1/3 cup whole milk
1 teaspoon salt
1 teaspoon culinary lavender, crushed to a powder
3 sprigs thyme, leaves only, chopped (about 1 teaspoon)
4 ounces goat cheese

Preheat oven to 375 degrees.

Add butter and oil to skillet over medium heat.  Add leeks and cook until softened, but not brown, about 5 minutes or so.  Remove from heat and let cool. 

In a bowl, whisk together the egg, milk, salt, lavender and thyme.  Crumble goat cheese into custard mixture.  Add cooled leeks and fold into mixture.

Place the thawed puff pastry on a floured surface.  Using a rolling pin, roll the puff pastry to about 1/4" thickness.  Using a sharp knife, cut the puff pastry into 12 even squares.  Take a regular 12-hole muffin tin and place squares of pastry into each hole, pressing gently to form a cup.

Fill the puff pastry cups with the custard filling.  Bake for 35 - 40 minutes, or until the pastry cups are puffed and golden brown and the filling is set.  Serve immediately with Lavender-Raspberry salad, recipe follows. 

Lavender-Raspberry Salad

2 pints fresh raspberries
¼ teaspoon culinary lavender, crushed to a powder
4 tablespoons champagne vinegar
1 teaspoon honey
½ cup extra virgin olive oil
Sea salt & freshly ground pepper
6 cups mixed garden greens


To a blender, add about 4 fresh raspberries, lavender, champagne vinegar, honey, oil, salt and pepper.  Blend until emulsified and taste for seasoning.  Adjust ingredients if necessary.  Balance will depend upon sweetness of raspberries and strength of lavender.  Toss greens with ½ of the vinaigrette, reserving remaining vinaigrette to drizzle on the plate as a garnish or to serve as extra dressing at the table.  Top salad with remaining raspberries.  


Thursday, June 19, 2014

Mindful Eating - A Key to Digestion and Feeling Great!

Do you get tummy aches often after eating? Suffer from heartburn or indigestion?  Or find yourself uncomfortably full after meals?  When was the last time you really slowed down and thought about the process of eating?


When we eat, we don’t often really stop to think about how the food we are enjoying actually nourishes our bodies—the actual physical and biochemical processes that turn food into energy and nutrients.  But, understanding that process can be vital in getting the most nourishment from the food we eat, and in making us feel our best after we eat.  Let’s take a closer look at the process of digestion, and how eating mindfully can help make us feel great!

Digestion Begins Before We Eat
Digestion actually begins before food ever enters our mouths.  When you first start to think, see, smell or think about food, your central nerve system sends signals that release hydrochloric acid and digestive enzymes which prepare your body to take in and digest food.

When you are stressed (and in fight-or-flight mode), this parasympathetic response doesn’t kick in and your digestive system doesn’t get primed for food.  Your body forgets about digestion, because it’s busy dealing with crisis.  This is one of the reasons it is important to slow down and center ourselves before meal time, not just mindlessly eating. 

Chewing: An Important First Step
Chewing food is important for two reasons.  First, the mechanical process of chewing breaks down food into smaller pieces that are more easily digested in the gut.  In fact, food should be ground down into a paste to be properly digested.  Second, chewing your food completely mixes it with saliva.  The saliva in your mouth isn’t just there to keep your mouth moist.  It also contains important digestive enzymes that begin to break down the building blocks of food (primarily starches) into smaller particles. 

Therefore, chewing food thoroughly is very important for proper digestion.  If you swallow larger pieces of food that haven’t been mixed with saliva, those food particles become food for bacteria, which can cause gas, bloating and discomfort.

Stop and think for a moment:  How long do you chew your food?

Digestion in the Stomach  
When you swallow, food passes down your esophagus and past the lower esophageal sphincter into your stomach.  When you are stressed, this sphincter can stay open, which can cause acid reflux, or heartburn.

The stomach contains hydrochloric acid and digestive enzymes, which mixes with the food you have chewed and begins to break it down into smaller parts (primarily carbohydrates and proteins) to make it ready to move into the small intestines.  It usually takes about four hours for the stomach to empty, depending on what you’ve eaten.  Simple carbohydrates empty faster, whereas meals with fiber, protein or fat empty more slowly.       

The stomach works best when it’s only about 80 percent full, giving plenty of room to mix everything up effectively.  If there’s not enough room, some food in the stomach may travel into the small intestines partially undigested, causing gas and bloating.  This means eating until you are about 80 percent full—satisfied but not stuffed.

The stomach also works best when it has enough stomach acid.  Digestion can be slowed by acid-reducing medications, such as proton pump inhibitors, that stop stomach acid production.  Reduced stomach acid can actually cause IBS and other digestive conditions.

The Small Intestines: Where Nourishment Happens
The small intestine is the powerhouse of digestion.  Here, the digested food from the stomach (called chyme) are mixed with digestive enzymes (like lactase) or other secretions (like bile) which further break them down for absorption into the body. 

The lining of the small intestines are covered in villi—little fingerlike projections which grab nutrients from the food and pull them toward the surface of the small intestines for absorption into the bloodstream.  The lining of the small intestines also keep potentially harmful organisms—like bacteria—out of the bloodstream.  Approximately 70 percent of your immune system is located in your gut, protecting you from toxins.  Like the rest of your body, your gut immune system works best with a whole foods diet and balanced lifestyle.

If you have larger food particles that have escaped into the small intestine (from not chewing enough, not enough stomach acid, or eating too much) the food may move slowly through the small intestines undigested and become a breeding ground for bacteria.  While bacteria mostly live in the large intestines, when they move in to the small intestines it’s called Small Intestinal Bacterial Overgrowth (SIBO), causing gas, bloating and discomfort.


The Last Stop:  The Large Intestine
All of the undigested food—what’s left of it, anyway—passes from the small intestine to the large intestine. In the large intestine, this undigested food is consumed by bacteria—most of them friendly flora that live in your body and are beneficial to you.  These good bacteria break down carbohydrates that we don’t have the enzymes to digest (like cellulose), producing biotin, vitamin K, short chain fatty acids, and other nutrients. 

We can increase these good bacteria in our gut by eating probiotic-rich foods (like yogurt, cheese, fermented foods) or taking a probiotic supplement.

It takes approximately 32 hours for digested food to move through your large intestines before it’s eliminated.  In the meantime, the large intestine absorbs nutrients produced by the bacteria and reabsorbs water into the body, before the byproduct is excreted. 
 
The Bottom Line on Digestion & Feeling Great

  1. Take a few deep breaths and a moment of silence before you eat.  Give yourself time to see and smell your meal so your body becomes ready for nourishment and digestion.

  1. Chew slowly and completely, giving yourself time to really taste and appreciate your food.  Make your meal last at least 20 minutes.

  1. Eat until you are 80 percent full, satisfied but not stuffed.  This gives your stomach enough room to effectively digest your meal.


  1. If you notice that you have symptoms of gas, bloating or acid reflux, think about these different stages of digestion.  Can you pinpoint the cause?  For example, too much stress, eating too quickly, eating too much, taking acid-reducing medications, too much sugar in your diet, no probiotic-rich foods?  Make small changes and see if your symptoms improve.

Monday, June 16, 2014

Making Meal Time Easy + Wild Rice, Kale & Roasted Tomato Gratin with Browned Yogurt Topping

Happy Monday!  We hope you had a fun weekend and are ready to make this a great week!

We know meal planning can be difficult.  It is, even for us.  Sometimes I stare into the refrigerator and the only thing I can come up with is scrambled eggs.  We all need inspiration.  

Here are a few tips I have found to be most helpful for eating well, along with a recipe for using up leftovers and transforming them into a delicious, comfort-food meal, which also happens to be perfect for Meatless Monday!


--When you get home from grocery shopping, wash and prep all of your vegetables, so they are ready to go when you are.  You’re more likely to eat them and not let them wilt in the crisper drawer.

--Wrap lettuce, greens, herbs in a damp paper towel, place in plastic bag and store in the refrigerator crisper drawer.  They last three times as long, which means no waste!

--Go ahead and chop vegetables for snacking, roasting or sautéing.  You’ll be thankful to yourself at mealtime.

--Cook one pot of grains or beans each week and store in the refrigerator, covered.  These can be used for soups, salads, side dishes.

--Make a big batch of roasted vegetables—broccoli, cauliflower, tomatoes, whatever you like.  These can also be tossed into salads, heated for a side dish, or just eaten as a healthy snack.

--Repurpose leftovers into a second day meal .  Transform one meal into another by turning the leftovers into a soup, stew, salad, sandwich, stir fries, or egg dish.

--Use your freezer! Anything saucy freezes well, like soup, stew, lasagna, enchiladas, casseroles.  Every time you make a large family-sized meal, freeze individual portions so you always have an inventory for lunch or for single dinners.

This recipe for a kale and wild rice gratin with yogurt crust was  inspired by a recipe from The Yellow House.  This gratin can be made with any leftover grains and greens that you have in your refrigerator.  You could use quinoa or barley, add roasted squash or zucchini—the options are endless!


Wild Rice, Kale & Roasted Tomato Gratin with Browned Yogurt Crust

Makes 6 - 8 servings

1 pint grape tomatoes
1 garlic clove, sliced
2 tablespoons extra virgin olive oil, divided
Pinch of red pepper flakes
Pinch of salt
1 leek, sliced
1 bunch kale, stemmed and chopped
2 tablespoons fresh basil, chopped
1 cup parmesan, grated
3 cups cooked whole grain and wild rice
1 cup Greek yogurt or 2 cups plain yogurt, strained*
3 eggs
Sea salt
Paprika

Preheat the oven to 350 degrees.

Place the tomatoes, garlic clove, 1 tablespoon of olive oil, red pepper flakes and a pinch of salt in an oven-proof dish.  Place in the oven and roast tomatoes for about 30 minutes, or until browned and softened.

In the meantime, heat a large skillet over medium-low  heat.  Add the other tablespoon of olive oil, the leeks and another pinch of salt.  Cook, stirring, until the leeks are very soft.  Do not let the leeks brown.  Add the kale and cook until it is just starting to wilt.  Remove from the heat and stir in the basil.

In a large mixing bowl, add the rice, kale, roasted tomatoes, 3/4 cup parmesan cheese and one egg.  Stir together until evenly mixed.  Spread the mixture in a baking dish. 

In another small bowl, mix together the yogurt, two eggs, remaining 1/4 cup parmesan cheese and a pinch of paprika.  Spread the yogurt mixture in an even layer over the wild rice mixture. 
Bake for 40 – 45 minutes, until the yogurt topping becomes browned.  You make turn on the broiler for a few seconds toward the end, just to brown it a little more.  Remove from the oven and let it cool a few minutes before serving.

Enjoy, preferably with someone you love!


*To make a thick Greek-style yogurt out of plain yogurt, just line a fine mesh strainer with cheese cloth.  Pour yogurt on top of the cheese cloth and place the strainer over a bowl.  Place in the refrigerator and let drain for at least 2 hours, or until you get the consistency you want.  The longer you let it drain, the thicker the yogurt will become.  Discard the water in the bottom of the bowl.  

Thursday, June 12, 2014

Power Green Lean Lasagna


By posting this recipe I am entering a contest sponsored by The Mushroom Council and am eligible to win prizes associated with the contest. I was not compensated for my time.


I went through a stage in second grade when my ponytails had to be perfect. And I don't mean just "nice looking," I mean I didn't have a stray hair out of place and there was not a bump to be seen. It's a phase my mom and I laugh about to this day because my ponytails look nothing like that anymore.


In eighth grade, I discovered the "messy ponytail." And that's when I realized that the occasional bump, stray hair, and imperfection not only looked and felt better, it made my life so much easier.


So what does this have to do with my favorite Mushroom and Spinach Lasagna? I’m getting to it, I promise.

When I first started cooking, I was so terrified of making mistakes. As someone who is a self-proclaimed people pleaser and perfectionist, I was so worried about my end result coming out messy, burnt, too bland, too spicy, too sweet, or too salty. Thankfully, I’ve made so much peace with this reality. I’ve made all of those mistakes (and way more), but I always learn from them and always have fun making the mistakes. I truly enjoy my time in the kitchen creating my masterpieces and disaster-pieces.

I developed this recipe a few years ago when I was craving lasagna, but didn’t want to have to go through the process of layering everything perfectly. This version is so easy to make, so satisfying, and so perfectly imperfect. The combination of the sautéed mushrooms with ground beef blend together to create a lighter version of lasagna compared to the typical super meat-heavy recipes. I’ve served this to many of the people I love and because of that, it’s one of my all-time favorite imperfect creations.


Power Green Lean Lasagna


Ingredients:


2 cloves garlic, crushed
½ cup onion, chopped
½ pound pasture-raised lean ground beef
3 cups tomato sauce
2 teaspoons oregano
2 cups crimini mushrooms, thinly chopped
4 cups of dark leafy greens of your choice (i.e. spinach, chard, kale)
2 cups reduced-fat Ricotta cheese
2 cups whole wheat pasta, cooked
½ cup freshly grated mozzarella

Instructions


1.      Preheat your oven to 375 degrees.

2.      Place a large pot of water on high heat on the stove. Once the water begins to boil, add the whole grain pasta and cook according to the directions on the package. Drain and rinse with cold water.

3.      Meanwhile, in a large pan, sauté the garlic and chopped onions over medium heat in the olive oil until slightly golden.

4.      Add the mushrooms, sautéing until the mushrooms soften.

5.      Add the ground beef to the onions and garlic mixture, separating the meat with your spoon, until cooked (about 7 minutes).

6.      Add the tomato sauce and oregano, stirring occasionally.  Reduce the sauce to a simmer on the stove.

7.      While the sauce is simmering, in a separate large bowl, combine the leafy greens with the ricotta cheese.

8.      Time to assemble! In a 9 x 13 inch casserole dish, place the cooked pasta on the bottom, top with the ricotta and green leafy mixture, and then top with the mushroom, beef and tomato sauce. Top with the mozzarella cheese.

9.      Bake in the oven for about 20-25 minutes.


Serves 6-8


Enjoy, preferably with those you love.


If you want to share your own love of mushrooms, The Mushroom Council is hosting a fun contest this summer called “Swap It or Top It.” The grand prize winner will receive $5000! How great is that?           


Friday, June 6, 2014

Oatmeal Flax Molasses Bread

I just returned from Israel, dreaming of burnt eggplant, whole roasted cauliflower, fresh salads for breakfast and beautiful, yeasty whole grain breads.

Actually, day dreaming is more accurate, since jet lag has left me sleepless.  Which has given me more time to bake.


One of my favorite breakfast places in Tel Aviv is Café Sonia Getzel Shapira, partly because the enclosed tree-filled courtyard is a serene place to enjoy breakfast but mostly because of their bread.  With breakfast, they serve Moraccan bread, soft and richly flavored molasses-colored rolls filled with oatmeal flakes.      

My first morning home, I had a craving for those rolls.  I modified my favorite bread recipe, to try to replicate Sonia’s, adding a little flax seed just for fun (and added fiber and omega-3s, of course). They were good, so I decided to try the recipe again as a sandwich loaf.  Here is the result.


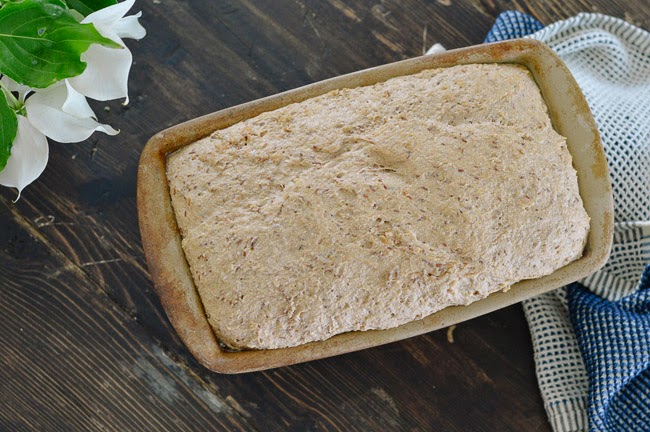
Don’t be afraid to make bread.  It’s really quite easy and takes very little hands-on time and the results are so rewarding.  Here's a play-by-play.  The instructions are below.


What’s better than warm bread, right out of the oven?  While the bread is rising and baking, you can do a million other things.  I suggest reading a magazine in the sunshine. 

I hope you enjoy, preferably sharing a slice with someone you love!

Oatmeal Flax Molasses Bread

Makes about 12 slices

2 cups warm water (about 110 degrees)
1 tablespoon molassas
2 tablespoons extra virgin olive oil
1 packet yeast (1/4 oz yeast total)
3 cups whole wheat bread flour
¾ cup whole rolled oats
½ cup ground flax seed
2 teaspoons sea salt
1 egg
1 teaspoon water

Add the two cups of warm water to a glass measuring cup or small bowl.  Whisk in the molasses.  Sprinkle the yeast on top of the water and stir or whisk slightly to incorporate the yeast into the water.  Let the yeast mixture proof for 5 – 10 minutes until the yeast foams and until you smell the yeast developing.  (If the yeast doesn’t foam, that means it’s not still alive and you have to try again.) 

To the bowl of your stand mixer, add the whole wheat flour, oatmeal, flax and salt.  Stir together. 

Pour the yeast mixture into the flour.  Stir with a wooden spoon until a shaggy dough is formed.  Cover with a towel and let sit for about 30 minutes. This lets the dough hydrate.  If you don’t have time to wait, you can skip this step.

Place the dough hook attachment on your stand mixture and knead for 10 – 15 minutes.  This is a wet dough, so don’t be concerned if it doesn’t necessarily come together in a dough ball.  If you don’t have a stand mixer, you can knead by hand.  You’ll probably have to knead in a little extra flour, which will just make for a more dense bread.  It will still be good.

Cover the dough with a towel and let rise for an hour in a warm place.  The dough will double in size.

In the meantime, prepare a loaf pan by spreading extra virgin olive oil on the inside, to prevent the dough from sticking.

Once the dough has risen, softly deflate it and then place the dough in the loaf pan, spreading it to the edges.  Cover with a towel and let it rise again, about an hour. 

Preheat the oven to 375 degrees.  Once the dough has risen for a second time, whisk together the egg and water and brush the egg wash on top of the bread dough.  This will make the top shiny. 

Place the loaf pan in the oven and bake for about 40 – 45 minutes, or until the bread is golden brown on top and sounds hollow when you tap the top.

Remove the pan from the oven and turn the bread out onto a baking rack to cool.  Let cool at least 10 minutes before slicing.  If you can wait that long.


Note:    If you want to turn these into rolls, just divide the dough into 8 pieces and bake on a baking stone for about 20 minutes at 400 degrees.

Wednesday, June 4, 2014

Single Serve Dark Chocolate Brownie with Raspberry Sauce

Sometimes you just need something sweet! We totally get it. With this recipe, you can certainly get your chocolate fix…in minutes! Make it a la mode with a scoop of ice cream or yogurt.  

This fruit-topped brownie is a wonderful sweet treat to make for a night in with the girls or with your special someone. Since this is a single-serve dessert, it’s a good way to satisfy a craving without going overboard. And with desserts, the very first bite is usually the best one anyways!

We hope you enjoy this dark chocolate treat featuring our personal favorite berry as much as we do! 


Ingredients:

Brownie-
3 tablespoons cocoa powder
¼ cup unsweetened applesauce
½ teaspoon baking powder
1 teaspoon vanilla
1 teaspoon maple syrup
1 tablespoon walnuts, chopped
1 handful dark chocolate chips

Raspberry Sauce-
¼ cup raspberries
1 tablespoon coconut sugar (or any type of sugar)
¼ cup water

Directions:
1. Combine all brownie ingredients in a small bowl. Mix.
2. Microwave for 30 second intervals (approximately 3 minutes total) until cooked.
3. Meanwhile, blend raspberry sauce ingredients in a food processor until smooth.
4. Pour onto the brownie and serve!

Enjoy, preferably with those you love!


Recipe and photo by our wonderful contributing blogger, Jaime Ruisi.